Tuesday, April 22, 2008

Readability Statistics


Readability statistics are something I have used with secondary students to check that their writing is at a suitable level. It is a feature that is available in Microsoft Word. After you have performed a spell check it will tell you at what grade level you are writing at and what the readability score is. You do need to turn on the readability feature and you can do this by going to Tools - Options, click on the Spelling and Grammar tab and select the 'Show the Readability Statistics'.


This example of a Year 5 student has a Grade level of 6.5 and the Reading ease is 76.9%
US Grade level comparison to NZ levels are Grade 1 =to NZ Year 2 or Grade 6 = NZ Year 7.


Reading Ease rates text on a 100-point scale; the higher the score, the easier it is to understand the document. For most standard documents, aim for a score of approximately 60 to 70.

This would also be a useful tool for teachers when they preparing written text for their students as it will guide their level of writing.

Bubblr, create comics or photo slideshows


Run your mouse without clicking over the slideshow to make it move.
Another way of publishing photos in a comic strip is using
Bubblr. Search for photos in Flickr by typing in a search word or a user name. Drag the photos you want to use down into the panels, drag the speech bubbles up and type in words. click on After Current to add more photos, click Publish when you are finished. This comic strip will be saved and then you can make the choice of emailing, adding to a blog site or printing.
This could be a great way to motivate reluctant writers as they can search for photos that interest them or they could be photos on certain topics. Be aware though that it is possible to get questionable photos if you type inappropriate words.

Friday, April 18, 2008

Avatars

I have had a teacher ask me if there is site where children can create their own avatars without having to register their names etc. Generally you do have to register but with some sites you can get away with doing a screen capture.

First of all 'What is an avatar?'
An avatar is a computer user’s representation of himself or herself.

If you have a yahoo account you can make avatars where you can copy and paste the code into your Blog site, here is mine!
Yahoo! Avatars Australia & NZ But this one is not really suitable for children, great for adults. Then I searched specifically for children and found this site Reasonably Clever Block Head Iconiser


To use this picture you need to take a screen capture (Windows users, press Print Screen button on your keyboard, paste into Paint, click and drag around the part you want and copy/paste it into the programme you want to use) (Mac users press Shift, Control, Apple, 4, click and drag around the part you want and paste it into the programme you want to use).

Another programme called Build your Wildself has students creating themselves and then adding animal body parts to finish off as a Wild Self. Once students had created their “wild self”, click on Get a Wild desktop, right click it and select Save Image As and you will have a copy of the avatar.


Kerpoof a site I have reviewed previously in this blog allows you to make avatars but you need to be registered. Once you have registered, go to My Stuff and create your avatar.


Again there is no download feature but you can do a screen capture before you click Save.


And then there is
DoppelMe you can create your avatar and when you have finished you can right click, select Copy and paste into the programme of your choice.


Finally Weemee. There are lots of choices to make changes to the avatar, you can screen capture it or register to get the code to insert into your blogs.


Teachers will need to try these out themselves to find out which is the best for their class situation.

Thursday, April 17, 2008

Slide - Make slideshows of your photos


Found this site http://www.slide.com/ that make slideshows of your photos, great for showing off a series of photos in a blog. Click on Slideshows to make the slideshow, select the Browse button choose photos from your hardrive by holding down the Ctrl Key and click OK. Choose from the choices of how you want your slideshow to look. The slideshow above has been created in a Puzzle format and the one below is sliding. Other formats available are Collage, Melt, News etc.


Tuesday, April 15, 2008

Free Web arcade games

freewebarcade.com is one of those sites where you would not like the children to have free reign in school time, but there are a few games that are worthwhile letting the children play.

Magic Pen is a physics-based drawing game. Guide the red ball or square to the flags by drawing shapes.


Airtyper great practice for those children who are starting to get quite good at touch typing and need a challenge.

Domino is just like the classics domino game. Click on a piece and it will slot itself into the right place. If there are not pieces to play with then you have to draw one from the deck. Pink pieces cannot be played.


5 differences is a spot the difference game, there are a series of animated pictures and you have to click on the differences.


Add like Mad you can choose an addition, multiplication or subtraction version of this game. Click on the squares to add the numbers so that they equal the value under the word 'Number'. If you add the numbers fast enough you will get bonus points. If you click on numbers that don't add up to the target number you will have to start over.


Tangram Create the tangram picture using the pieces available

White Jigsaw is an interesting twist on doing jigsaws, it is completely white. Great for developing those visual spatial skills.
If you are going to use these games with children, be aware that they can access other games, there may need to be some rules put in place as to 'this is the game we play in this time'. Hyperlink these games in PowerPoint so that the children are clear about what games they are supposed to be playing.

Thursday, April 10, 2008

UDL Book Builder

Discovered this website UDL Book Builder where you can create, read and share digital books. You do need to register to create books.


Click on Create and Edit books. There are plenty of guides to help you create books


You can add your own graphics and photos. If you are making a story using photos of your children, comicfy them by changing them in a photo editing programme like Photofiltre.

UDL has lots of helpful tips on the way, they help you to write text, choose images, add audio clips and glossary terms, and there are prompts, hints, and models for your books. You can use your published books with students online, download them to your computer, copy them to a CD, or share them with others by clicking on "Share to Library."
Here is an example of a book


Teachers can use this site to create their own books for children or students can publish their own work.

Tuesday, April 8, 2008

ToonDoo and creating comics on line


Since posting on this blog about Kerpoof, I have been directed to another comic making interactive online site. This one is called ToonDoo. You can make 1-3 page comics using numerous backgrounds and graphics. You can change the body position of the figures and facial expressions. There are lots of props and drawing tools to create your own backgrounds. You can save the comics and publish for everyone to see or you can publish privately. If you publish for anybody to see then anybody can comment. That was the only problem with this programme were the comments as they could be inappropriate for children. Some of the cartoons made by other people were a little dodgy as well.
The actual editing page is fine but the main home page changes all the time so you are never sure what is going to pop up. But it is still a worthwhile site to use with careful monitoring. Particularly for younger children I would set up the editing page for them, then there is no need for them to see the home page.
There is no download feature which is a shame as it would be great to download the comic and print it whole screen. But there are always ways around this, you can print out the page when it is in View mode, cut out the comic and glue on to other paper. Or you can take a screen capture (Windows: press the Print Screen button on your keyboard, open Paint, Press Ctrl V and then use the square selector tool to crop the area you need. Copy paste that piece into the Wordprocessor of your choice) Mac Users press Shift, Ctrl, Option and 4, click and drag around the comic, paste into your wordprocessor page.
Again this is another great interactive writing motivating tool.

Monday, April 7, 2008

Motivating Writing

Kerpoof is a great piece of software that you can use to motivate


children's writing. It is free, colourful and interactive.
Make a Picture - choose a background and make a picture using the graphics provided, use the text button to add text to the page. Print the page out as full A4 or as a card. You can also choose to print it out in full colour or as a colouring book page
.


Make a Movie option allows you to create a movie with moving objects. There are 7 different story lines to pick from, several scene pages and a limited amount of graphics for each page. Choose from the animation list to animate the objects. Text can be added to the scene as well. It can be saved to an account at Kerpoof or printed.


Make a drawing has drawing tools where you can create a picture and print it out.


Make a card has 8 preset cards including Birthday, Thank you etc. with a limited set of graphics to add.


The Make a Story is my favourite option with 19 different scenes, some graphics, text boxes and text speech bubbles. You can also add more scenes to the story.
This would be a great site for those children who don't have anything to write about as it provides the scenes and graphics, but they get to add the words. They can manipulate the graphics and can add their own drawings to it by using the pen tool. It prints out beautifully as well.

Thursday, April 3, 2008

Photo Editing and Importing cutout photos into PowerPoint or Word

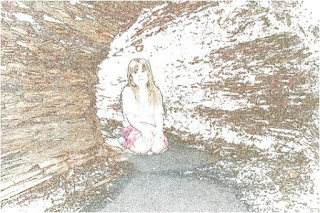
Photofiltre http://photofiltre.free.fr/download_en.htm is a free photo editing programme. It is very simple to use and has some wonderful filters that make amazing changes to photos.


Go to FIlter - Edges - Monchromatic edges to create the effect above. Experiment with all of the filters, but don't forget to 'Save As' so you don't lose your original image.


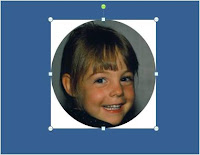
You can also use it for cropping shapes out of your photos. In this example the circle tool button has been selected and clicked and dragged around the face. Go to Image - Crop and the new image will appear, go to File - Save As and name your image.
When you import it into a coloured background in Word or PowerPoint though you will see a white background around the photo.


You will need to use the Transparent button on the Picture Menu (in Version 2003) or click on the Format tab - Recolor -Set transparent colour (in Version 2007). Once you have selected the Transparent button click on the white area of the photo and it will disappear.

Typing Games


Teachers often ask me about typing games. I have developed some activities that can be played using old keyboards, old computers or even with laminated printout keyboards http://www.jsharp.co.nz/keyboardactivities.htm


There are also several internet sites that have quite good interactive games on them.
This is a particularly good one at BBC.co.uk http://www.bbc.co.uk/schools/typing/