I have been talking quite a bit to teachers about students documenting their own Personal Learning Journey. It is loosely based on 'Ipsative' Assessment which is the measurement of where we were, where we are now and where we want to be. The following diagrams build on that with the student deciding with the teacher what they are going to have to do to succeed with their goal. The junior one is more simplified then the senior example.
Click on the diagrams to see them in full view.
Junior
Senior
These were created in Kidspiration and Inspiration. Students can type into them or they can be printed out and students write in them.
The examples are available for download on this site.
Showing posts with label Kidspiration. Show all posts
Thursday, March 10, 2011
Tuesday, October 12, 2010
Creating Math Activities
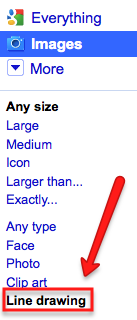
Tania wanted to know how to create clock math activities in Inspiration today. In 10 minutes she had made 2 activities that children are going to be using independently and in groups using the mimio.Step 1: Google 'Blank Clock Faces'. Click on Line Drawing in the side panel options
Step 2: Drag the clock face of your choice onto the Kidspiration or Inspiration page
Step 3: Draw the lines by clicking on the line tool on the toolbar
Step 4: Change the lines into arrows by going to Link - Arrow Direction
Step 5: Add a text box below the clock
Step 6: Click and drag around the whole clock picture and text box, press Ctrl or Command C and paste on another part of the page, repeat until you have covered the page. Save your activity as a template.The same activities can be created in IWB notebook software as well. Do a search for clock and you will find a clock face, hands and digital display.
mimio, Smart notebook, Activinspire
Monday, September 13, 2010
Creating Reading Activities
I was talking to a teacher today about creating activities for her reading programme. I like to start with my top reading group which means that the other groups will be able to do that reading activity when they reach it. Kidspiration and Inspiration are perfect for this. The activities don't take long to create especially if you create activities using old templates.
Here are a couple of examples using the book Rosie at the zoo.
After they have used these as followup activities they can then be stored in a folder for that reading group as extra reading activities, make sure the books are also kept together in a 'Book Box' so that the students can use them with the computer activities.
Here are a couple of examples using the book Rosie at the zoo.
After they have used these as followup activities they can then be stored in a folder for that reading group as extra reading activities, make sure the books are also kept together in a 'Book Box' so that the students can use them with the computer activities.
Saturday, March 13, 2010
Lab lessons with Juniors
I was working with a computer lab teacher today looking at ways to work with students. She had a class of Year one students came in!
You need to put some sanity saving measures in when working with a class of 5 and 6 year olds in a lab. They can't sit for long, because they are too excited, so it is best to get them on the computers straight away. If possible don't have them sharing as their collaborative skills at this age aren't that great!
Beforehand you will have needed to teach a couple (or more) of more able students to help the others to log on, and then click on the programme they are going to be using i.e KidPix or Paint. Let them go for it, experimenting with the tools or doing their favourite thing. Once everybody is logged on and in the programme, THEN you can start to add some order to your lessons.
The following are the stages you could go through with Juniors
These happen over several sessions!
Mouse Practice
You need to put some sanity saving measures in when working with a class of 5 and 6 year olds in a lab. They can't sit for long, because they are too excited, so it is best to get them on the computers straight away. If possible don't have them sharing as their collaborative skills at this age aren't that great!
Beforehand you will have needed to teach a couple (or more) of more able students to help the others to log on, and then click on the programme they are going to be using i.e KidPix or Paint. Let them go for it, experimenting with the tools or doing their favourite thing. Once everybody is logged on and in the programme, THEN you can start to add some order to your lessons.
The following are the stages you could go through with Juniors
These happen over several sessions!
- free play
- while they are in free play, work with individuals showing them a new tool i.e dragging background pictures and adding stamps
- show them the typing tool and type their name (you will need a display on a wall that shows the Upper and Lower case letters for those who haven't mastered them yet)
- type the words they know how to write (have high frequency words on the wall for students to look at)
- first official lesson can be drawing a picture about their topic or what they are writing about in their classroom LIMIT THE TOOLS! Pencil and Paint Can ONLY
- Repeat this session many times but bring something new in when the students look ready for it like typing your name (I also teach new things to students who look like they are capable of it as I walk around)
- next session might be typing a sentence
- at some stage teach the more able students how to save (they will help you to save students work)

- once the students are used to all these steps then you might introduce a new programme/Application
- at the same time talk to the students about the magic line, put two hands on the keyboard, this hand can't cross over this side of the magic line and the other hand can't cross over that side of the magic line (I put little pieces of folded paper between the keys to create a magic line)
- draw a picture for their story
- Type a heading for their story that could be printed out
- find a picture in Kidpix that could be printed out
- always remind them of the magic line
- thumbs only on the space bar
- pinkies only on the delete key
- rest fingers on the home keys (those students whose fingers can reach and are ready for it)
Mouse Practice
Mouse Practice PowerPoint Show version
View more presentations from Jacqui Sharp.
To make these Learning Centres follow these instructions
Finally, limit the time students are on the computers, 30 minutes is plenty of time for younger children to be staring at screen. If you have extra time over, then bring out the cameras and take photos that could be used for motivational writing or for publishing their work.
Just remember at this age more than any other age, the students will develop their skills at differing speeds...some a LOT faster than others. Identify those children that have those skills and use them to help you to teach the others. You will find that children learn best from each other!
To make these Learning Centres follow these instructions
Finally, limit the time students are on the computers, 30 minutes is plenty of time for younger children to be staring at screen. If you have extra time over, then bring out the cameras and take photos that could be used for motivational writing or for publishing their work.
Just remember at this age more than any other age, the students will develop their skills at differing speeds...some a LOT faster than others. Identify those children that have those skills and use them to help you to teach the others. You will find that children learn best from each other!
Wednesday, March 10, 2010
Researching smarter
There are still a lot of teachers that are sending children off to do 'research' on Google using one key word.i.e bird (253 million hits later). When they finally find a page that has the information they want, it is invariably printed out, and trawled through looking for information.
1. have at least 3 key words if you are looking for information on birds, what sort of birds are you looking for, what country etc so now the Google search becomes 'bird native wading' and because we want to search for New Zealand Birds we click on pages from New Zealand.
Now we have 10,400 hits!
2. Open up a mindmap/Graphic Organiser (I like to use Kidspiration or Inspiration, or you can use online versions) Create a simple mindmap
3. Go back to the internet site you have chosen, press Ctrl F (Command F for Macs) type in one of the key words from questions in mindmap like 'eats'

4. The word eat did not appear on my page so I used a synonym such as feed, click the next button to see each instance of the word feed until you see a sentence that will answer your question
5. Go back to your mindmap and type in the information you found
6. Go between the Internet site and the mindmap adding information
7. Add a picture to your mindmap by right clicking on a picture in your internet page, select Copy Image, go back to mindmap and paste (Ctrl V)
8. Don't forget to reference where information and picture came from
Model this way of researching to your class.
Use this model in all curriculum areas.
Become a smarter researcher yourself and your students will follow!
This is long, tedious, boring and usually irrelevant!
Become a smart researcher with some of these strategies1. have at least 3 key words if you are looking for information on birds, what sort of birds are you looking for, what country etc so now the Google search becomes 'bird native wading' and because we want to search for New Zealand Birds we click on pages from New Zealand.
Now we have 10,400 hits!
2. Open up a mindmap/Graphic Organiser (I like to use Kidspiration or Inspiration, or you can use online versions) Create a simple mindmap
3. Go back to the internet site you have chosen, press Ctrl F (Command F for Macs) type in one of the key words from questions in mindmap like 'eats'

4. The word eat did not appear on my page so I used a synonym such as feed, click the next button to see each instance of the word feed until you see a sentence that will answer your question
5. Go back to your mindmap and type in the information you found
6. Go between the Internet site and the mindmap adding information
7. Add a picture to your mindmap by right clicking on a picture in your internet page, select Copy Image, go back to mindmap and paste (Ctrl V)
8. Don't forget to reference where information and picture came from
Model this way of researching to your class.
Use this model in all curriculum areas.
Become a smarter researcher yourself and your students will follow!
Saturday, July 25, 2009
Bookmarks, Interactive Learning Centres and Delicious
In past blog posts I have talked about Interactive Learning Centres and bookmarks in Delicious. Teachers have embraced this management method of directing students to certain websites. This is a great idea and works well as long as the links are directly linked to a specific activity that is supporting the teaching and learning.
Ways to use Delicious
Ways to use Interactive Learning Centres (ILC)
Ways to use Delicious
- make it the home page on your class computers

- make bundles of your reading groups and math groups (See page 7 of How create a Delicious Account)

- directly link to the activity rather than the page that might have several links on it
- send the link to your Delicious page home on your school or class newsletter
- when Parents ask you what are suitable sites for their child to access, give them the Delicious link
- when you start a new topic make sure that you have a tag or a bundle for it so that students can access these links at home
- make a bundle that is specifically child friendly games (check them out to make sure they are not full of inappropriate advertising)
- set student homework using Delicious Links
- keep your bundles well organised and your tags clear
- ensure that you have a Spelling bundle with spelling and grammatical tags (very useful when homework has not been set, but students can use these for practice at home and at school)
Ways to use Interactive Learning Centres (ILC)
- create pages that are group/curriculum specific (Reading or Math Groups names)
- directly link to the activity rather than the page that might have several links on it
- use PowerPoint or Keynote to create ILCs (later versions allow you save as PDF files which means you can play them on any machine irrespective of Platform or Version of software)
- if you have special needs children create an ILC that is specific to their need and level
- create teaching lessons using ILC, make them in PowerPoint and then copy or import into Interactive Whiteboard software. Hyperlink to the Internet or games and activities that you have made in PowerPoint, Word, Pages, Keynote, KidPix, Inspiration or Kidspiration
Interactive Website
View more presentations from Jacqui Sharp.
Tuesday, March 10, 2009
Kidspiration as a mindmapping tool
One of the teachers I have been working with recently is trying to integrate ICT into her daily programme and wanted some easily achievable activities her junior children could do in the lab based around her topic of 'Our Friends'. The school has the software Kidspiration and so far her children have been making basic mindmaps around certain ideas and topics.The children know how to create symbols off one main symbol and type in information.

I showed this teacher that when you are clicked on a symbol you can change it to a picture and still keep the writing or add writing underneath it. So now the children are going to extend their thinking on their topic and add pictures by clicking on the name of their friend and adding what they like to do. So before the students go to the lab, they need to survey their friends to find out what they like to do.
Once the students have finished the mindmap task, they will then analyse their mindmap and make comparisons and assumptions that they will then present to their group. The rest of the group will compare with with their mindmaps and students can hypothesise what these results mean.
This is also an ideal time to do some 'just in time' teaching with the children, if you see students who are coping quite well with the task then teach them some more skills, such as in this case how to colour the symbols so it differentiates each idea, or how to change the shape of the symbol in the centre. Before you know it, this idea will spread around the lab as other students pick it up and pass it on.
I emphasise to teachers that they should do this same task several times (in different topic areas) consolidating and building on the skills children have developed.
Tuesday, March 3, 2009
Organising Activities for Reading and Maths
If you have made some group specific activities in Kidspiration, Inspiration, PowerPoint, Keynote, Word or Pages, then you need to make them easily accessible. One method that used to work well for me and that I have introduced to many teachers is to make your group folders
i.e. for Maths, they might be called, 'Squares, Hexagons, Triangles' and leave them on the desktop. Copy the files/activities for the week into the folder. Teach students how to find their folder and the activities. For Maths never put more than 5 activities into their folder. If there are fast finishers make a 'Fast Finisher' folder with activities they have completed in the past, sometimes I will choose ones like Time, Measurement and Geometry for maintenance practice.


You can also include Interactive Worksheets in Word, Pages, PowerPoint or Keynote with hyperlinks to the activities in that folder or to websites. This example to the right has been created in PowerPoint, and the screen captures are pictures of the actual online activity. These games are linked to the websites as a follow-up to what has been taught in Maths that week.
The following example has been created in Word. This is an interactive Reading worksheet with links to Inspiration activities and space to record their answers.
And this is one of the examples of the Inspiration worksheets the above Word document links to.
If all of the related files are kept together in the same folder then you will not have any trouble accessing all of the files. But do remember one thing! When creating activities for students, save them as templates! If students have to save their work for it to be marked, teach them how to save to their own folder.
Interactive PowerPoints that hyperlink to games do not need to be saved by students. The only things that need to be saved is when changes have been made.
Before I send children off to complete activities, I always go over the activity I expect them to complete. Don't assume that they know how to do the activity i.e how to click on a hyperlink. Talk them through how they are going to do it and especially if they need to save a copy to their own folders.
i.e. for Maths, they might be called, 'Squares, Hexagons, Triangles' and leave them on the desktop. Copy the files/activities for the week into the folder. Teach students how to find their folder and the activities. For Maths never put more than 5 activities into their folder. If there are fast finishers make a 'Fast Finisher' folder with activities they have completed in the past, sometimes I will choose ones like Time, Measurement and Geometry for maintenance practice.

The following example has been created in Word. This is an interactive Reading worksheet with links to Inspiration activities and space to record their answers.

And this is one of the examples of the Inspiration worksheets the above Word document links to.If all of the related files are kept together in the same folder then you will not have any trouble accessing all of the files. But do remember one thing! When creating activities for students, save them as templates! If students have to save their work for it to be marked, teach them how to save to their own folder.
Interactive PowerPoints that hyperlink to games do not need to be saved by students. The only things that need to be saved is when changes have been made.
Before I send children off to complete activities, I always go over the activity I expect them to complete. Don't assume that they know how to do the activity i.e how to click on a hyperlink. Talk them through how they are going to do it and especially if they need to save a copy to their own folders.
Tuesday, November 25, 2008
Helping children to become better researchers
To teach children how to become
competent researchers requires several stages. I like to use Inspiration (or Kidspiration) Graphic Organisers to guide them in this task. Once they have some knowledge of the topic at hand teachers generally set them an activity where they have to come up with a question to research about. Most children find this difficult.
That is why I use this Graphic Organiser 'What do we know about?' Students fill in what they know about the topic. I then ask them to choose one of the ideas that they would like to know more about. They then choose one of the ideas and turn that into a question.
The nouns or verbs in the question are likely to be their search words.
The next step is to go to Google or any other search engine http://delicious.com/sharpjacqui/searchengines enter in the search words. Click on a website. Generally most of the websites they will choose will have a lot of text which can be quite daunting to read. This is when I introduce my trick of Ctrl F (Command - F for Macs). This brings up the 'Find' box,
type in one of the key words, if that word is on the page it will be highlighted, ask the child to read the sentence the word is highlighted in, refer them back to their research question and ask them if it answers their question, if not they click on the Next and that will highlight the next instance of that word, again they read that sentence. "Does it answer the research question?" If so the children highlight just that sentence, copy and paste into a Word document. They continue in this way until they have enough information that answers their research question.
The next Graphic Organiser is the 'Finding Information on the Internet'.
Children type in
For this to work well and for students to become independent researchers this format needs to be repeated often. It can work well for novel studies, topic research, and as a starting point for several writing genres such as procedural, argument and explanation.
competent researchers requires several stages. I like to use Inspiration (or Kidspiration) Graphic Organisers to guide them in this task. Once they have some knowledge of the topic at hand teachers generally set them an activity where they have to come up with a question to research about. Most children find this difficult.That is why I use this Graphic Organiser 'What do we know about?' Students fill in what they know about the topic. I then ask them to choose one of the ideas that they would like to know more about. They then choose one of the ideas and turn that into a question.

The nouns or verbs in the question are likely to be their search words.
The next step is to go to Google or any other search engine http://delicious.com/sharpjacqui/searchengines enter in the search words. Click on a website. Generally most of the websites they will choose will have a lot of text which can be quite daunting to read. This is when I introduce my trick of Ctrl F (Command - F for Macs). This brings up the 'Find' box,

type in one of the key words, if that word is on the page it will be highlighted, ask the child to read the sentence the word is highlighted in, refer them back to their research question and ask them if it answers their question, if not they click on the Next and that will highlight the next instance of that word, again they read that sentence. "Does it answer the research question?" If so the children highlight just that sentence, copy and paste into a Word document. They continue in this way until they have enough information that answers their research question.
The next Graphic Organiser is the 'Finding Information on the Internet'.Children type in
- What the Question is
- What the keywords are
- the search engine they are going to use
- the criteria for the websites they will use
- the links to the websites
For this to work well and for students to become independent researchers this format needs to be repeated often. It can work well for novel studies, topic research, and as a starting point for several writing genres such as procedural, argument and explanation.
Tuesday, November 18, 2008
Kidspiration, Word and Projectors
No Interactive Whiteboard or Internet access, what could she do?
I was in a class yesterday where the teacher was really keen to use her laptop and the school projector in her classroom teaching. I showed her how to set it up and we decided where was the best place to put it. Of course the projector is not suspended
from the ceiling...it has to sit on a table, but we could work with that. And we had to use extension cords, so duct tape was used and new rule in the class imposed "Walk around the table rather then through the gaps!"
Next was the discussion of how to use this as a learning tool.
First of all we looked at the Kidspiration math activities that are available on the s
chool server. These types of activities can be used as a teaching tool. Because we were projecting onto the whiteboard the children could go up and write the answers with whiteboard markers (which they love doing)and the teacher could also get children to come up and type in the answer.
And of course Kidspiration is a great authoring tool, very simple to create your ow
n activities and if you are still using Version 1 or 2 then you must upgrade to Version 3 as it has a folder dedicated to great math activities that you can adjust to suit your class and a new view which gives you maths tools to create activities with.
So using the laptop and the projector for maths was easy... What about writing?
We talked about how she models her writing on the whiteboard in the class so I suggested that she use 'Microsoft Word' and the font Comic Sans with a large font size so that all children can see it.
It is a good idea
while you are modeling the writing to turn off the capitilisation, (2007 go to Menu Button
and select Word Options, click on Proofing, click on AutoCorrect Options, deselect Capitalise first letters of sentences, click OK) (2003, go to Tools, click on AutoCorrect Options, deselect Capitalise first letters of sentences, click OK)
Students can make corrections using white board markers. This is also a good opportunity to teach keyboarding editing skills, as you do the editing say what you are doing "I need to fix up a spelling mistake so I am going to take my mouse and click at the end of the word scool and I am pressing the Backspace key, now I am typing in the correct word". This is a common editing mistake I see children doing, instead of going and clicking on the word to correct it they will backspace a whole sentence , therefore wasting time as they have to type the sentence again. And of course this is great time to remind children what fingers they should be using, such as "What finger do I use to make a full stop?" Have a couple of old keyboards available so that children can pass them around and practice making the full stop with the ring finger on their right hand.
So even without Internet access there is still a lot of ways you can use a projector and a laptop!
I was in a class yesterday where the teacher was really keen to use her laptop and the school projector in her classroom teaching. I showed her how to set it up and we decided where was the best place to put it. Of course the projector is not suspended
from the ceiling...it has to sit on a table, but we could work with that. And we had to use extension cords, so duct tape was used and new rule in the class imposed "Walk around the table rather then through the gaps!"Next was the discussion of how to use this as a learning tool.
First of all we looked at the Kidspiration math activities that are available on the s
chool server. These types of activities can be used as a teaching tool. Because we were projecting onto the whiteboard the children could go up and write the answers with whiteboard markers (which they love doing)and the teacher could also get children to come up and type in the answer.And of course Kidspiration is a great authoring tool, very simple to create your ow
n activities and if you are still using Version 1 or 2 then you must upgrade to Version 3 as it has a folder dedicated to great math activities that you can adjust to suit your class and a new view which gives you maths tools to create activities with.So using the laptop and the projector for maths was easy... What about writing?
We talked about how she models her writing on the whiteboard in the class so I suggested that she use 'Microsoft Word' and the font Comic Sans with a large font size so that all children can see it.
It is a good idea
while you are modeling the writing to turn off the capitilisation, (2007 go to Menu Button
and select Word Options, click on Proofing, click on AutoCorrect Options, deselect Capitalise first letters of sentences, click OK) (2003, go to Tools, click on AutoCorrect Options, deselect Capitalise first letters of sentences, click OK)Students can make corrections using white board markers. This is also a good opportunity to teach keyboarding editing skills, as you do the editing say what you are doing "I need to fix up a spelling mistake so I am going to take my mouse and click at the end of the word scool and I am pressing the Backspace key, now I am typing in the correct word". This is a common editing mistake I see children doing, instead of going and clicking on the word to correct it they will backspace a whole sentence , therefore wasting time as they have to type the sentence again. And of course this is great time to remind children what fingers they should be using, such as "What finger do I use to make a full stop?" Have a couple of old keyboards available so that children can pass them around and practice making the full stop with the ring finger on their right hand.
So even without Internet access there is still a lot of ways you can use a projector and a laptop!
Wednesday, November 5, 2008
Recount Writing
Following on from the last post about Explanation writing here are my versions of Recount Writing for Seniors and Juniors
Recount Presentation
Junior Recount
Recount Presentation
Junior Recount
Junior recount powerpoint 2003 version
View more presentations from Jacqui Sharp.
Recount presentation
View more presentations from Jacqui Sharp.
Tuesday, September 16, 2008
Reluctant Writers and ICT
Some children just have nothing to write about, their imagination is stifled and they think they have nothing to write about. There are many reasons for this but one I would presume to say is that a lot of students are visual learners, not necessarily visual thinkers (their imagination has been stifled or ideas have been imposed on them).This is where computers can help...at any age level. I am not particularly advocating that they type (or draft) their story using the computer but instead use the visual aids available to
BUILD A STORY

Use Programmes like KidPix, Kidspiration, Inspiration, Pages, PowerPoint or Word, anything that allows access to a graphic library and get the students to build a story using the graphics available to them. They can then then move them around and create a visual story from the pictures they have found. This visual story can be printed out and used for the motivation for writing which could then be drafted in their writing books.
Another idea would be for children to record themselves on an iPod, PDA or a tape recorder talking about their visual story and this can then be played back to them as they are writing.

Use Programmes like KidPix, Kidspiration, Inspiration, Pages, PowerPoint or Word, anything that allows access to a graphic library and get the students to build a story using the graphics available to them. They can then then move them around and create a visual story from the pictures they have found. This visual story can be printed out and used for the motivation for writing which could then be drafted in their writing books.Another idea would be for children to record themselves on an iPod, PDA or a tape recorder talking about their visual story and this can then be played back to them as they are writing.
Tuesday, June 3, 2008
Kidspiration and Fairytales

One of my school's main topics at the moment is Fairytales and the focus is Narrative writing. Combine Kidspiration, graphics from Microsoft Clipart gallery and children's writing and you have an activity that children enjoy doing and a wonderful assessment tool for the teacher.
Insert some graphics onto a Kidspiration page (or Inspiration). Save the page as a template
Go to Teacher - Enable Teacher Menu, select Teacher - Save with Activity Wizard. Click Next 5 times. Select where you would like to save it
Children open the template, move the graphics around to form the sequence of the story and type in the story. When the story is finished click on the
Writing button, click on the Publish button
. You may be asked if you want to open it in Word or Appleworks, choose the application you want to use.
The diagram will transfer to this application and students can now edit their text.
Teachers can use this as an assessment tools as they can see what the student's original thoughts were in the diagram and how they
edited and reworked the text to create their narrative below the diagram.
Juniors, teaching and learning with Data projectors
In other sessions she looked at different fairytales and developed a storyweb around
individual fairytales.
Subscribe to:
Posts (Atom)


