Tuesday, July 1, 2008

Planning, linking, websites and Interactive Whiteboards

With Interactive Whiteboards comes a huge amount of activities already created for you. Plus there are all the other activities that are teacher made in Kidspiration, Inspiration, Word, PowerPoint etc. And then I see that teachers have found all these wonderful websites but are not fully utilising them to their full potential. How can we manage all these websites and activities we may have stored on our computers?
Answer: Incorporate it into your planning. Hyperlink the activities, websites, or teaching resources into your planning and launch the sites from there. This is a perfect way of managing all of these links and it is all in one place plus you are able to see what resources you are mainly using. In this example I have colour coded the activities, red for Flip charts, orange for PowerPoint, green for Inspiration, blue for websites and black for book work.See my new blog dedicated to mimios and IWB http://mimioiwb.blogspot.com/

Monday, June 30, 2008

Modeling Writing and old Keyboards


When you are modeling writing on the whiteboard, have some old keyboards available for children to use. So when you are talking about using capital letters or full stops in writing you can at the same time say
  • How do we make a full stop on the keyboard?
  • What finger do we use?
  • How do we make a capital letter?
Use that teachable moment to incorporate some keyboarding skills! Don't assume that all children know how to do it!

Thursday, June 5, 2008

Ideas for drafting writing

Here are some ideas for drafting writing that have worked well in classrooms

Mindmap ideas for writing, use coloured felt tips, glue into writing book.
WordProcessor (Word, Pages, Appleworks)

•Set the page line spacing to 2.5
•Children type for a given amount of time, (15 – 30 minutes)
•If they haven’t finished in that time then they carry on with pen and paper
•They proofread and edit their work with a pen, publishing does not have to be completed on the computer


Using Graphic Organisers
•A group of 2-4 children can work on one computer drafting


•They print it out when finished

•They write their own individual stories using their drafts in their writing books using their graphic organiser draft
OR
•You could have blank printouts for children to write in and then glued into books and then the story is rewritten using the graphic organiser as a framework for the writing


Here are some other ways that you might like to try that teachers have found successful

•If you have a PDA they have WordProcessing software on them, perfect for the intrapersonal (self smart) student, who likes to work alone. Use the infrared or Bluetooth to send to a computer
•Old blackboards , take a photograph, print out and stick in writing book
•On an OHP , students can write with coloured OHP pens and stick in writing book
••On a whiteboard (photos can be taken as evidence of writing)
•Magnetic Board , take photos


Use a Drafting task board to manage the drafting choices.
This example on the right shows the different drafting choices and the names of the students

Wednesday, June 4, 2008

Going to the Computer Lab


A lot of time can be wasted going to the computer lab, and this is very valuable time as there isn't much of it allocated to you. Here are some tips to make it a worthwhile experience.


  1. before you leave your classroom ensure that children know the rules and the things they have to do when they get to the lab. i.e. turn computers on, log on, open up server (if work needs to be saved there) open a Word or Pages document start practising touch typing their name (address, town etc). Younger ones can open KidPix and type the alphabet (doing all these things will not give children time to interfere with each other or 'ride the chairs', also keeps the noise down to a minimum)
  2. when you are teaching something new, make sure all eyes are on you and bodies are pointed your way, hands off the keyboard
  3. always repeat the task at least twice
  4. if some children are having the same difficulties, bring them up to your laptop and datashow and show them all over again
  5. have at least 3 monitors that can help with problems
  6. use that teachable moment with the more capable children and teach them something more advanced as you see they are coping with the original task
  7. make the tasks meaningful and authentic
  8. when finishing in the lab, make sure that all children know the procedures of how to shut down programmes correctly, and log out

Tuesday, June 3, 2008

Kidspiration and Fairytales


One of my school's main topics at the moment is Fairytales and the focus is Narrative writing. Combine Kidspiration, graphics from Microsoft Clipart gallery and children's writing and you have an activity that children enjoy doing and a wonderful assessment tool for the teacher.

Insert some graphics onto a Kidspiration page (or Inspiration). Save the page as a template


Go to Teacher - Enable Teacher Menu, select Teacher - Save with Activity Wizard. Click Next 5 times. Select where you would like to save it

Children open the template, move the graphics around to form the sequence of the story and type in the story. When the story is finished click on the Writing button, click on the Publish button. You may be asked if you want to open it in Word or Appleworks, choose the application you want to use.

The diagram will transfer to this application and students can now edit their text.

Teachers can use this as an assessment tools as they can see what the student's original thoughts were in the diagram and how they

edited and reworked the text to create their narrative below the diagram.


Juniors, teaching and learning with Data projectors

Phillipa uses the data projector frequently in her teaching of junior children. They have been looking at fairytales and Phillipa has been using Word, autoshapes and the projector to create class mindmaps on what fairytales children could identify.


In other sessions she looked at different fairytales and developed a storyweb around individual fairytales.


From this children have used Kidspiration and graphics to make a pictorial representation of their fairytales. Note in the example below one glass slipper at the castle.

Tuesday, May 20, 2008

Reading and Math Management Boards


Following on from my previous post about management systems, I had management boards for my reading and maths. These boards weren't managed by me but were managed by the children. Several teachers I work with are successfully using this system. The reading board looks like this.
There are a variety of activities for children to do and they all know what they are doing at this time of the day. The 'Reading Study' here stands for their Computerised activity. Before I send children off to do this activity I always demonstrate it first preferably by projector on a whiteboard.


Depending on how many computers there are is how I will organise the reading group. Two can share a computer, working on a activity together. Or if there is less computers available I might use my label management technique. This works very successfully in dividing up reading or math groups. This is an example of the maths board. There are 3 math groups, half of the math group goes on the computer and they have allocated labels, M for mouse,K for keyboarding, D for director ( they tell everybody what to do), O for observer (they stand quietly). The other half will do related activities in their books, or complete reading games.

My Maths task board looks like this with 3 groups, and I always demonstrate the activity with the children before I send them off to do it.


Another management technique I use is to have the childrens maths and reading group folders on the desktop. Children only go into their folder and there maybe only 2 or 3 activities available in the folder so that the children know that this is their folder and those are the only activities they can do. It is important that chldren know exactly what they are going to do, when they are going to do it, where the activity is and what their role is! That way everybody knows what they are doing and you are able to get on with the job of teaching children without worrying about what is happening in the computer centre.

Transferring Inspiration diagrams to Word or Pages


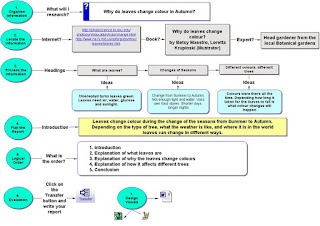
One of the lesser know features of Inspiration and Kidspiration is the 'Transfer' button. I find this a very powerful assessment tool for both teacher and student.


Once the student has finished their Inspiration diagram as in this 'Informational Report'


they click the Transfer button


WIndows computers will transfer this document to Microsoft Word, Apple computers will give you the choice of Word or Pages. Click on your choice. Click OK in the next window (if you are using Inspiration 8 or 9).
The Inspiration diagram transfers as a graphic. All of the text transfers into Word (or Pages) as editable text.Children can then manipulate the text (change font, size and style). Other graphics can be added.
This is a great assessment tool as the teacher can see what the student's original thoughts were illustrated in the Inspiration diagram and then they can see how they manipulated that information to publish the final piece.

Friday, May 16, 2008

Management Boards

To manage computers in a classroom you need to have systems in place. Why do you need management systems? Mainly for sanity reasons! If there are systems in place that monitors and manages the children's time and activities and the children know how to use them then this will make less work for you.
How many times have you had children come up to you and say
"I have fi
nished!" and then they wait for you to tell them what to do next
"I have nothing to do!"
"The computer's not going!"

"I can't hear the computer!"
"I can't find the game!"
or of course the fighting over the m
ouse and the keyboard. The first management board you should put in place is the Monitors Board. The rule is that 'you have to see a monitor before you see me' and if the monitor can't work it out they can ask another one until it is obvious if teacher help is needed at all. I like to divide my monitors into 3 parts of the day so that the same one is not being interrupted all the time. I always tested new games or programmes with monitors first before I showed them to the class, that way I could generally test out what things might go wrong and I could train the monitors up with how to deal with it.

This is my
Writing Task Board. Everybody starts Drafting together, and then gradually children start moving their name labels into the Proof Reading area, they complete all their proofreading tasks and then they move into the Drafting area. There is where the potential problems could happen and this is why you need a Writing Choices board.


This is where you can have a variety of choices to suit the different learning styles and intelligences. It is also a place to put in some computerised activities. I always have the classroom set up with lots of learning centres around the room and there is always a typing centre with old keyboards, laminated keyboards (see my website for downloads) or I will make use of old computers for keyboarding practice. I might also have a computer setup with spelling list or grammatical activity and these are always a followup to whatever I am teaching in the class.

For these types of activities you need separate management systems in place, this is where I find the Ladder sys
tem very useful. In this example all the children start off in 'Waiting for turn' and they transfer their name label to 'Had a turn' when they have completed their task.

Here are some more examples of these type of monitoring boards


Tuesday, May 13, 2008

'Do it instead of'...rather then 'As Well As'

'Do it instead of'...rather then 'As Well As'
That is my new motto. Part of the problem when integrating ICT into teaching and learning is that teachers are treating it as an add on! In some cases there are still classrooms that are operating with only one computer and/or another one barely working but most schools I visit nowadays have between 2-4 computers in their class.
Think of this
Instead of giving your reading or maths group a worksheet, create the worksheet in Kidspiration, Inspiration, Word, PowerPoint (or whatever you would like to use). Make one child in the group the mouse operator, one the keyboard, one writing on a whiteboard, one on a calculator or anything else you can think of, then the children can swap. You can have at least 3 children on one computer. So instead of writing on a worksheet they are working together using the computer.
Another example where this works well is in Art. Whatever the children are doing in art, someone can be doing the same thing using the computer. Artrage has pencil, paintbrush, crayon, felt tip and pastel tools. Experiment with the pencil and you can even do shading! A teacher on
ce said to me "we are doing weaving, how can we use the computer to create a woven pattern?" My answer was 'use Word or PowerPoint with autoshapes and colours'. Find graphics with textures and weave with them. Children will learn a lot of computer skills and use a lot of problem solving doing this type of exercise.

The other important thing to remember is that not everyone in the class has to do that same activity on the computer, maybe in art this week it is this group of children, next week it is another group of children with maybe a different computerised art activity and so on.